lab04 : Intro to GUIs, Graphics
| num | ready? | description | assigned | due |
|---|---|---|---|---|
| lab04 | true | Intro to GUIs, Graphics | Wed 10/25 02:00PM | Wed 11/01 05:50PM |
A quick overview of this lab
This lab is different in structure from any you may have ever done before in previous courses, so please read this section to help you understand the “big picture”.
In this lab, we are introducing you to some github workflow that mirrors real world practice, where repositories are “forked”, and then the folks that fork repositories issue “pull requests” to the original repository forked from.
-
Forking a repository means that you create your own copy where you can commit and push changes that don’t directly affect the repository forked from. In essence, forking creates a kind of “family tree” where the forked repository is the child, and the one forked from is the parent.
-
When you “fork” a repository, sometimes you will make a change in your private copy, and you want to contribute that change back to the original repository you forked from. That contribution back is called a “pull request”.
In this lab, we have a goal as an entire class. What we want is to end up with one repository where every single person in the class has made a contribution to the single tree of source code in the form of a class and a set of test cases for that class. Getting that all organized is a bit complex, but as with many problems in Computer Science, a “divide and conquer” strategy can help. The TAs (Kevin B., Jonathan, and Yun) and Prof. Conrad will manage the pull requests to the master repo and the mentors (Aryaman, Joel, Johnny, Kevin L., Natasha, Sean, Scott, Steven) will provide an intermediate layer as shown in the tree below. In this diagram, we have dchen, cgaucho, and jcruz standing in as sample students—that’s where each of you will be in this tree (i.e. at the leaves).
The repo at the top of this tree is this one: https://github.com/UCSB-CS56-F17/F17-lab04
Here’s how we will proceed.
-
We’ll separate the class into teams, by mentor Each team will be led by one of the mentors:
-
We’ll start with one public repository, on github.com (NOT github.ucsb.edu). That repo is:
https://github.com/UCSB-CS56-F17/F17-lab04
This repository is public (anyone can fork, and anyone can pull), but only the TAs and Instructor will have “push” access to this repository.
-
Each of our mentors () will then fork the top-level repository once.
-
Then each of you will then fork your mentors repository, NOT the original.
-
You’ll then add some code into the repository, in a subdirectory of src—a subdirectory src/edu/ucsb/cs56/drawings/yourCSILuserid (where the last part is replaced by your csil username, to ensure uniqueness. If your CSIL username contains characters not permitted in Java package names, e.g. hyphens, substitute underscores, e.g.
b-obamawould becomeb_obama.) -
Once your code is tested, you’ll commit it and push it in your own repository, e.g. github.com/cgaucho/F17-lab04
-
You’ll then issue a pull request to your mentor’s repo (e.g. https://github.com/mentorgithub/F17-lab04 if
mentorgithubis your mentors github id. -
Your mentor will collect all of the pull requests for a given team, merge them together, and then issue pull requests to the master repo.
In the end, all of our code will be together in one big repository.
Here are the step-by-step instructions.
Overview
In this lab we will
- see our first Java GUIs (a simple JFrame)
- learn how to do simple, low-level awt-based graphics in that JFrame
Actually, while GUI stands for “Graphical User Interface”, there won’t actually be that much user interaction with our program this week. We’ll learn more about user interaction (i.e. widgets such as buttons, menus, text fields, etc.) in a future lab.
In your forked copy of the repo, you’ll add a directory for your CSIL username in the package structure, and add some code. This week, the code you add will be code to do some simple 2D graphics in a Swing GUI JFrame. You’ll test that code, and then issue a pull request against your mentor’s forked copy. What we will end up with, as a class, is one repo that has everyone’s code in it.
NOTE: This week’s lab is an INDIVIDUAL lab. You may work in pairs only for the purpose of supporting and helping each other (i.e. asking each other questions), but each of you needs to do individual work on this lab. There will be more pair programming work later in the course.
Step-by-Step
Step 0: Locate your mentor’s forked copy of the repo
Your mentor is the mentor that you’ve been working with, who typically sits in the same row with you in lab. To find your mentor’s name, consult the page https://ucsb-cs56-f17.github.io/info/projects/
Instead, you need to locate one of the repos below, based on which mentor you are assigned to.
Again, you do NOT fork the repo https://github.com/UCSB-CS56-F17/F17-lab04. You fork the repo listed in the table below, for your individual mentor.
If you are unable to find that repo, please ask for help.
Step 1: Fork your repo
Now, on the github page for your mentor’s fork of the repo, there will be a link where you can fork the repo near the upper right hand corner of the page.
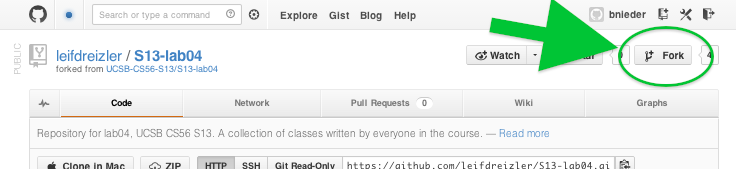
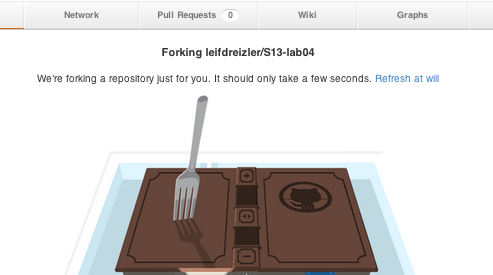
Click the fork button. You should then see a screen like this one:

You may see more than one button, but you should click on the button that corresponds to your own github username (e.g. bnieder in the example above). Next, you’ll see this amusing picture for a while:
Finally, you should see this: your own forked copy of your mentor’s repo:
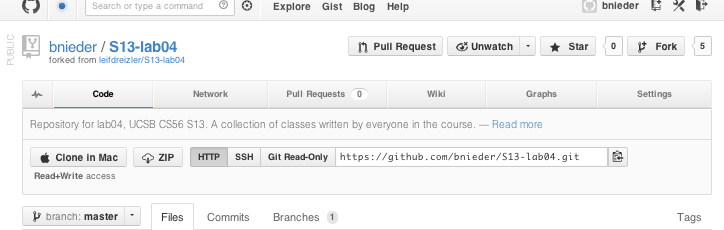
Now that you have the page for this repo, that is the one that you are going to clone.
Step 2: Clone your own forked copy of the F17-lab04 repo
You should be on the page now for your own forked copy of the repo, a copy forked from your mentor’s forked copy. Copy the ssh URL for that repo, as in previous weeks, and prepare to clone:
cd into your ~/cs56 directory (or where you like to work) and clone the repo: (here cgaucho should be replaced with YOUR github username)
git clone git@github.com:cgaucho/F17-lab04.git
Step 3: Create your own subdirectories under src/edu/ucsb/cs56/drawings
cd into src/edu/ucsb/cs56/drawings. You’ll find directories there. One of them is utilities. The others, including pconrad, are all usernames of various contributors to this repository.
Create a “sibling” directory that has the same name as your CSIL username (not your github username).
There is a REASON you should make it your CSIL username–this will make the build.xml file much more convenient to work with when you are on CSIL.
HYPHENS: If you have hyphens in your CSIL username, replace them with underscores in your directory name. That will be true throughout the instructions and i WILL NOT SAY IT EVERY SINGLE TIME. :-)
Then cd into that directory.
You can probably cd there with:
cd src/edu/ucsb/cs56/drawings/${USER}/
Or for folks that replaced hyphens with underscores, this magic command should automatically do the right thing:
src/edu/ucsb/cs56/drawings/${USER//-/_}/
If you type pwd, you should now see that your path under src is:
src/edu/ucsb/cs56/drawings/yourCSILusername/
That corresponds to a Java package name of:
package edu.ucsb.cs56.drawings.yourCSILusername;
And that is going to be the first line of the files you put into that directory.
Now, create two subdirectories under this directory, called simple and advanced, so that you have directories:
src/edu/ucsb/cs56/drawings/yourCSILusername/simple
src/edu/ucsb/cs56/drawings/yourCSILusername/advanced
Those correspond to package names
package edu.ucsb.cs56.drawings.yourCSILusername.simple;
package edu.ucsb.cs56.drawings.yourCSILusername.advanced;
- (With hyphens replaced with underscores if needed. I really won’t mention this every time—please know that in general, its true. Promise.)
Step 4: Inspect the file SimpleGui1.java from the pconrad subdirectory
Under the src/edu/ucsb/cs56/drawings/pconrad directory, there is a file SimpleGui1.java.
Note that the VERY FIRST LINE in this file is:
package edu.ucsb.cs56.drawings.pconrad;
As a reminder, when you have a code in a package, you need a line that specifies the package, and you need your source code to live in a directory structure that reflects the package name. You’ll need to keep that in mind later in this lab.
Now look over the rest of this file. The code in this file comes from HFJ page . It may be helpful to read pages 354 and 355 again (you may have recently read them as part of a homework assignment) to review what this code is doing.
You should be able to run the code by using the ant
pconradSimpleGui1 target from the build.xml that came with this
repo.
- IMPORTANT: You should not have to make any changes to this build.xml at anytime during this lab. If you think you need to make changes, check with your mentor and/or TA before doing so, since changing the build.xml may complicate the merging of your changes later.
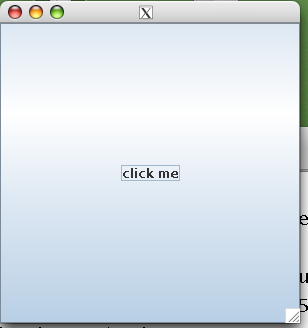
Run the program now. There may be some lag, but what you hope to see is a window like the one below. (If you get an error about DISPLAY, see the tip right after the image below.)
Clicking the button won’t do anything (except perhaps “flash” a little bit)—because, duh, we didn’t write any code to tell it what to do. That comes later in the lab.
So, the only thing you can do is click the red X (what it looks like will be different on Windows, Mac or Linux) to close the window.
NOTE: if you are not in CSIL (i.e. you are working from your PC or Mac), you might get the following error:
    Exception in thread "main" java.awt.HeadlessException:
    No X11 DISPLAY variable was set, but this program performed an operation which requires it.
The way to fix depends on whether you are using Windows, Mac or Linux; instructions can be found at https://ucsb-cs56-pconrad.github.io/topics/x11/
If the GUI came up, you are ready for the next step.
Step 5: Copy the file SimpleGui1.java from the pconrad subdirectory into your subdirectory
Now copy
src/edu/ucsb/cs56/drawings/pconrad/SimpleGui1.java into the src/edu/ucsb/cs56/drawings/yourCSILusername directory that you created back in an earlier step.
- change the package line as needed (the first line in the file)
- add your name as an additional author (with a second
@authortag in the Javadoc comment.
If you are in your src/edu/ucsb/cs56/drawings/${USER} directory then you should be able to just type this to copy the file into your directory.
cp ../pconrad/SimpleGui1.java .
Then fix the package line. Be sure that the VERY FIRST LINE in your new personal copy of SimpleGui1.java is:
package edu.ucsb.cs56.drawings.yourCSILusername;
… of course, replacing yourCSILusername as needed, and substituting hyphens for underscores as needed.
You should now be able to compile this file and run it by typing this at the command line.
The second command uses the plain old ”java” command, but specifying the classpath (the build directory) and the full package name and the class name.
ant compile
java -cp build edu.ucsb.cs56.drawings.yourCSILusername.SimpleGui1
If you get this message its probably because you copied a class from one directory to another, but forgot to change the “package” line in one of them:
        [javac] ... /src/edu/ucsb/cs56/drawings/.../SimpleGui1.java:13: duplicate class: edu.ucsb.cs56.drawings....SimpleGui1
        [javac] public class SimpleGui1 {
        [javac]        ^
        [javac] 1 error
You can use this command from the top of your repo to look for all files named SimpleGui1.java in the entire directory tree:
find . -name SimpleGui1.java -ls
You’ll then see the duplicate classes, and you can make sure they are in different packages. You may need this tip at later stages in the lab also.
Once you’ve compiled, you should be able to run with this command. This uses the plain old fashioned “java” command to invoke the Java Virtual Machine (JVM), specifying the classpath (the build directory) and the full package name and class name.
java -cp build edu.ucsb.cs56.drawings.yourCSILusername.SimpleGui1
Another way to run this, if you are on CSIL (or you use the “tips” in the box below for running on your own machine), is:
java -cp build edu.ucsb.cs56.drawings.${USER}.SimpleGui1
or if you have hyphens:
java -cp build edu.ucsb.cs56.drawings.${USER//-/_}.SimpleGui1
You should also be able to run your program from ant as well by typing ant mySimpleGui1 as long as your are running on CSIL:
- The mySimpleGui1 target uses the value of the environment variable USER to choose the package name in which the java task will look for the SimpleGui1 class
What if I’m not running on CSIL, but on my own machine?
If you are NOT running on CSIL, then if your own laptop’s concept of your “username” is the same as your CSIL username, the ${env.USER} trick will just magically work.
If not, there are workarounds:
- You may be able to make things work by setting the environment variable USER on your local machine to your CSIL username.
- In bash (Linux, Mac), this is done by running the command
exportUSER=cgauchoto change the value of USER to cgaucho. (Use YOUR csilUsername, not cgaucho.) - For Windows, you are on your own, since this may differ from one Windows version to another, but Windows also has the concept of “environment variables”.
- In bash (Linux, Mac), this is done by running the command
This may also be a fix to the hyphen problem, since if your username is foo-bar-fum you may be able to use this or the local equivalent to “fake out” the system in to thinking your username is something else:
export USER=foo_bar_fum
Of course, it is not easy to know whether you are running the pconrad version of SimpleGui1, or your own, since at the moment, they are exactly the same code except for the package name. So, to differentiate them, go into the code, and find this line:
JButton button = new JButton("click me") ;
Change the text “click me” to something else of your own devising, such as:
- “click me you gorgeous creature”
- “click me and I’ll grant you three wishes”
- “click me and (you fill in something witty here) “
Also, add two more line after this line of code to set the background color of the button. You can create a color by doing the following (you choose the three numbers, in each case values between 0 and 255).
java.awt.Color myColor = new java.awt.Color(204,255,153); // R, G, B values.
button.setBackground(myColor);
button.setOpaque(true);
If you want to see some example colors, try this chart
When you’ve tested by running both the pconrad and your own versions of SimpleGui1.java, both from the command line and from ant, commit the file you added (your version of SimpleGui1.java) and push it to origin master. (Suggested commit message: “added updated version of SimpleGUI1 to my src directory - done with Step 5”.) Then you are ready for the next step.
Step 6: A Tip: using the $T and $B environment variables to make navigating packages easier.
This step consists entirely of just a “tip” for when you are working with packages. There is nothing to turn in from this step, so you can skip it if you like. But its a really useful tip, so I recommend that you read it.
https://ucsb-cs56-pconrad.github.io/topics/t_and_b_env_vars/
Step 7: Copying code for Simple Drawings, Compiling and Running
In this step, you are going to copy some code from the pconrad/simple subdirectory into your own CSILUsername/simple directory.
What will happen is that you will leave the pconrad versions UNCHANGED, and make changes to the versions in your own CSILUsername/simple directory. That way:
-
You’ll always be able to refer to the original
pconradversions, both by reading the source code, and running the code. -
When you do a pull request to merge your changes into the original F17-lab04 repo that you forked from, there won’t be any merge conflicts—your changed versions will be in a separate directory, under a separate Java package.
Copying
cd into your CSILUsername/simple directory, and copy with this command:
cp ../../pconrad/simple/*.java .
Fix the Package Names
Since you are copying code from one subdirectory into another, you’ll need to fix the package names.
You can do this the hard way, or the easy way.
- The hard way: edit each file individually in your favorite text editor
- The easy way: use the unix command “sed” to do it to all the files at once.
The “sed” command is a “stream editor” (you can learn more about it by typing “man sed” at the unix command line.)
Assuming you are in the $B directory, you can do a global search replace on all the .java files at once, replacing foo with bar by doing this command (no
sed -i -e 's/foo/bar/g' *.java
NOTE: On Mac OS, the sed command is slightly different:
sed -i .bak 's/foo/bar/g' *.java
In this case, we want to replace pconrad.simple with yourCSILUsername.simple
sed -i -e 's/pconrad.simple/yourCSILUsername.simple/g' *.java
You can easily see if it worked by using this command, which displays the first line of every .java file along with its filename:
head -1 *.java | more
Compile and Run Both Versions
Once you’ve copied these, you can now compile them and run them.
- Compiling should just work with
antcompile- If you get a “duplicate class” error, see the tip under an earlier step about what is wrong and how to fix it.
- There is a single main called PictureViewer that shows a few pictures. The following table shows how to run both the original versions and your own versions. At this stage, they should produced the same result.
| which verison | with ant | old fashioned way |
|---|---|---|
| original | ||
| (don’t modify this one) | ant pconradPV | java -cp build edu.ucsb.cs56.drawings.pconrad.simple.PictureViewer |
| Your version | ||
| (where you make changes) | ant myPV | java -cp build edu.ucsb.cs56.drawings.${USER}.simple.PictureViewer |
| If you have hyphens: | ant myPV | java -cp build edu.ucsb.cs56.drawings.${USER//-/_}.simple.PictureViewer |
Step 8: Fix the snowman
Your next task is to work with the version of the simple drawing code that you copied into your OWN package (leaving the pconrad versions unmodified.)
Look through the code and try to understand how it works. Fix the snowman so he has a head. Go into the code for PictureComponent, and add code to draw a circle on top of the snowman’s head.
Read the comment, and refer to the material in Chapter 12 of the textbook about using 2D graphics in Java (which you read for homework, right!?!)
Look also at the code that draws the house, and figure out how it works. Make sure you understand the role of
- the
PictureComponentclass (and why itextends JComponent) - the
PictureViewerclass (and why itextends JFrame) - the
Circleclass (and why itextends Ellipseandimplements Shape)
You need to understand these ideas before you’ll be ready for the next step, and also you’ll need to understand them for the next Exam. So if you have questions, stop and ask your Mentor, TA or Instructor.
Once you are satisfied that you understand this code, and when your snowman has a head, you are ready for the next step.
Step 9: A more complicated set of drawing routines
Now, look at the code in the pconrad/advanced subdirectory. You are doing to do the same thing with that code that you did with the “simple” code in step 7—that is, you are going to copy it into your own “advanced” subdirectory, and change all the package names.
The code is in the pconrad/advanced subdirectory, and you want to copy it just like you did in Step 7.
- This time, though, I’m going to let you figure out how to do the Unix commands to copy the code, fix the package names and compile.
- I will give you some help with running the code though, because it is a little different.
The MultiPictureViewer class has a main that optionally takes a command line argument. Depending on the command line argument, it can draw several different pictures. The pictures that are drawn are specified in the class “AllMyDrawings” with methods drawPicture1, drawPicture2, and drawPicture3.
- With no command line argument, MultiPictureViewer will end up drawing the picture from drawPicture1.
- With a command line argument of 2, or 3, it will invoke drawPicture2, or drawPicture3, respectively.
To invoke MultiPictureViewer with no command argument, use:
| which verison | with ant | old fashioned way |
|---|---|---|
| original | ||
| (don’t modify this one) | ant pconradMPV | java -cp build edu.ucsb.cs56.drawings.pconrad.advanced.MultiPictureViewer |
| Your version | ||
| (where you make changes) | ant myMPV | java -cp build edu.ucsb.cs56.drawings.${USER}.advanced.MultiPictureViewer |
| If you have hyphens: | ant myMPV | java -cp build edu.ucsb.cs56.drawings.${USER//-/_}.advanced.MultiPictureViewer |
To invoke MultiPictureViewer with a command line argument of 2, use:
| which verison | with ant | old fashioned way |
|---|---|---|
| original | ||
| (don’t modify this one) | ant pconradMPV2 | java -cp build edu.ucsb.cs56.drawings.pconrad.advanced.MultiPictureViewer 2 |
| Your version | ||
| (where you make changes) | ant myMPV2 | java -cp build edu.ucsb.cs56.drawings.${USER}.advanced.MultiPictureViewer 2 |
| If you have hyphens: | ant myMPV2 | java -cp build edu.ucsb.cs56.drawings.${USER//-/_}.advanced.MultiPictureViewer 2 |
For command line argument of 3, just do the same thing, putting a 3 in place of the 2. If you want to add additional command line arguments to your own version, you’ll need to find the places to change the code in your own versions of:
AllMyDrawingsPictureComponent
Note that the ant build.xml only has targets built in for running
MultiPictureViewer with command line arguments of 2 and 3, and you are
NOT supposed to modify the build.xml file since that would create
merge conflicts. Instead, if you have more than three pictures, you
can just use the “old fashioned way” of running the code (with a real
java command line) to invoke command line arguments other than 2 or 3.
A brief tour of the Advanced Drawing Routines
These “advanced” drawing routines will use many of the concepts we’ve been learning in the reading, and the homework assignments, including inheritance, and implementing interfaces.
’'’Start with House.java: ‘’’
- This code illustrates how we can make a line drawing of a house that
extendsGeneralPathWrapperandimplementsShape(i.e. the Shape interface).
- The reason that we want to be able to implement the Shape interface, is that doing so allows us to do arbitary transformations on the shapes we draw.
Look for example at the code in the drawPicture1 method of AllMyDrawings.java
- Here we are using the House.java class to draw some houses, and also do some translation, scaling, and rotation.
’'’Next, look at HouseWithWindows.java: ‘’’
- This shows how we can use inheritance to build on a drawing we’ve already made, and just add something new to it.
’'’Next look at CoffeeCup.java: ‘’’
- This shows how we can start with a “hard coded” drawing, i.e. one that has absolute coordinates drawn on graph paper, and end up with a routine that will produce a drawing at any size, and at any location on the screen.
- You can find uses of the CoffeeCup in the other methods of AllMyDrawings.java
- The AllMyPictures class has static methods that take a g2 object and draw a picture. These methods are called inside two classes:
’'’Finally, look at MultiPictureViewer.java, MultiPictureComponent.java, and WritePictureToFile.java ‘’’
- MultiPictureComponent draws one of several pictures, depending on a parameter passed in at the time the object is constructed
- MultiPictureViewer is a JFrame and a main that passes through an argument
- WritePictureToFile.java calls one of the methods of AllMyDrawings to write a picture to a file (e.g. one that can be incorporated into a web page.)
Once you’ve looked over this code a bit, you are ready for the next step… the most fun one of all.
Step 10: Decide on something that you can draw
Now, decide on something that you can draw with JUST lines, circles and ellipses. It may be something very simple: an ice-cream cone, a lollipop, a set of railroad tracks. Don’t get too fancy—for now we want to keep it relatively simple.
IMPORTANT: Stick for the moment with just lines, and circles and one color per object.
For now NO FILLS, and no MULTIPLE colors per object. (Again, if you want to do the all the fancy stuff, including FILLS and multiple colors, you can do that in a choice points project—just not in THIS lab.)
We need to stick to line drawings for now, because we are going to use them as an example of working with interfaces and inheritance in Java. If you have multiple colors, or do anything beyond a simple connection of lines and circles, the inheritance/implement thing we are going to do isn’t going to work, and you won’t be able to use the techniques given here for translation/rotation/scaling of your objects.
One catch: what you draw must be different from what everyone else in the class is drawing. There is a Gauchospace forum where you can register what you want to draw: that’s right here:
BEFORE you register your drawing, though, read the rest of this section, down to where it says: ok, now you can register. :-)
A very important thing is that for whatever you draw, rather than drawing it in a hardcoded fashion, you should create a method to do the drawing—one that takes parameters for the location and size of the drawing, and that extends GeneralPathWrapper and implements Shape.
As an example, the code in the “simple” directory has a PictureComponent.java with a hard-coded house, and a hard coded (almost finished) snowman.
So instead of a hard coded house like this, where the
      Rectangle house = new Rectangle(100, 200, 100, 100);
      g2.draw( house);

       // lroof and rroof are the left and right sides of the roof,
       Line2D.Double lroof = new Line2D.Double(100, 200, 150, 150);
       Line2D.Double rroof = new Line2D.Double(150,150, 200,200);

       g2.draw(lroof);
       g2.draw(rroof);
We’d like to see instead something like the House.java class in the “advanced” subdirectory.
Another example is the code in the CoffeeCup.java file shown below: this is useful if you already have some “hard-coded” points that you are trying to convert to being parameterized with height, width, and a reference point (e.g. the lower left, or bottom center, or whatever.)
So, you will end up creating a new class for your object (Skateboard.java, SoccerField.java, whateveer) Create that file in YOUR package:
edu.ucsb.cs56.drawings.yourCSILusername
You will also create a second class, which should inherit from your first one. As an example, look at the class HouseWithWindows which extends House.
So before you register your drawing, you should think of whether there is some way you can extend it with some additional little “tweak” to be another more detailed object.
So, now, if you have:
- thought of something you can draw with lines, rectangles, circles and ellipses (and any other drawing primitives that can be incorporated into a GeneralPath)
- thought of some way to extend it slightly to another object
you can register your drawing on Gauchospace. Here’s the link again:
Then you are ready to start working on your own code under your YourCSILUsername/advanced directory.
Step 11: Draw something that you can draw
Now we are ready to actually start drawing our own pictures.
cd to the directory src/edu/ucsb/cs56/drawings/yourCSILusername/advanced, and set B to that directory
cd src/edu/ucsb/cs56/drawings/yourCSILusername/advanced
export B=`pwd`
In that directory, create a java source file for the first object you are going to draw. You may want to copy either House.java or CoffeeCup.java as a model.
Change the name of the class as needed, then edit the rest of the file as needed to draw your object.
To test your drawing, change the methods inside AllMyDrawing—the three versions of drawPicture (1, 2 and 3) to draw YOUR drawings instead of the House and the CoffeeCup.
- Just like in the methods shown, draw your object using different colors, at different positions, and using different sizes.
- Show the way the object can be translated (moved around), rotated, and scaled (changing the size).
- Make three interesting arrangements of your objects in the three pictures.
- Change the labels on the pictures as appropriate (using the methods that put “text” on on image—see the sample code from the pconrad pictures.)
To compile and run, see the instructions at the earlier step where we set up the code in your own copy of the “advanced” directory.
Make sure that your code works with both the ant tasks that bring the image up on the screen, as well as the ones that write it to a file.
Make sure that as you create your code, you have good Javadoc for any methods you add or change.
- You will definitely lose points if you are drawing a Skateboard, but your Javadoc talks about a house or a CoffeeCup!
- Similarly, there should not be variables for “roof” or “window” on “handle” if you are drawing an object that has no roof, window, or handle.
Step 12: checking over your code
Before you proceed further, check over the items in the rubric at the end of this lab file to ensure that you didn’t leave anything out that would cause you to lose points!
Step 13: Generate your javadoc and test it
Generate your Javadoc and give it a good going over. Make sure all the methods you created have good javadoc comments, and that the generated javadoc looks good.
UNLIKE IN PREVIOUS LABS, you will NOT put your javadoc online. Instead, just generate it into the javadoc subdirectory, which is in the .gitignore file, and look at it with a web browser to check it over.
You can use the “File Open” feature of your web browser, or a “file://cs/students/mycsilid/cs56/F16-lab04/javadoc/index.html” type URL, as long as your web browser is on the same file system as your cloned github repo.
The grader will generate the javadoc separately, and check it separately.
Make any changes needed, and commit and push those.
Step 14: A pull request
Navigate back to the github web page for your F17-lab04 repo. You should see a button near the top marked “pull request”. Now is the time to click that button!
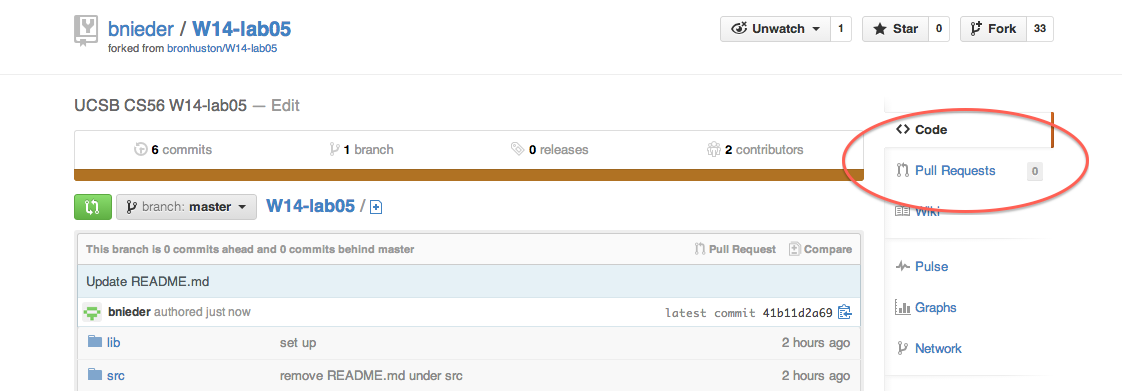
After you click it, you should see something like this:
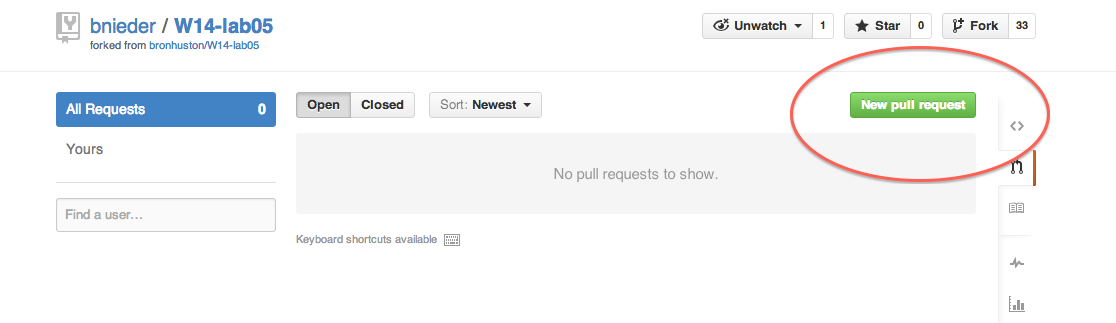
After you click that, you should see a page where you’ll fill in things in the manner shown here:
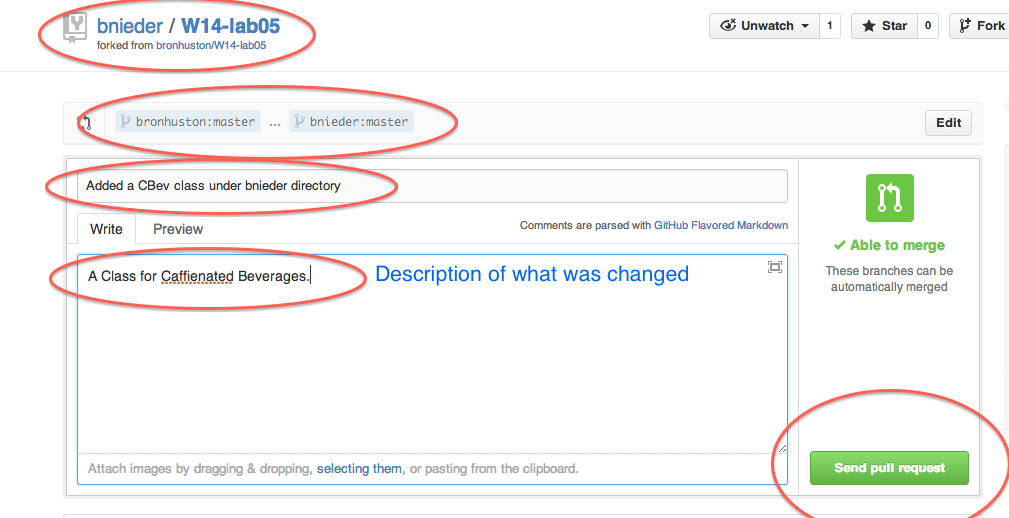
Notice on this page (see red circles near top of page in diagram below) that the pull request is going from your fork of the repo in the direction towards your mentor’s fork of the repo.
Now fill in the name of the pull request with an appropriate title and comment such as: “Pat’s lab04 submission, a class to draw a NyanCat”. Then click the “Send Pull Request” button.
You should then see a page like the following indicating that your pull request was submitted.
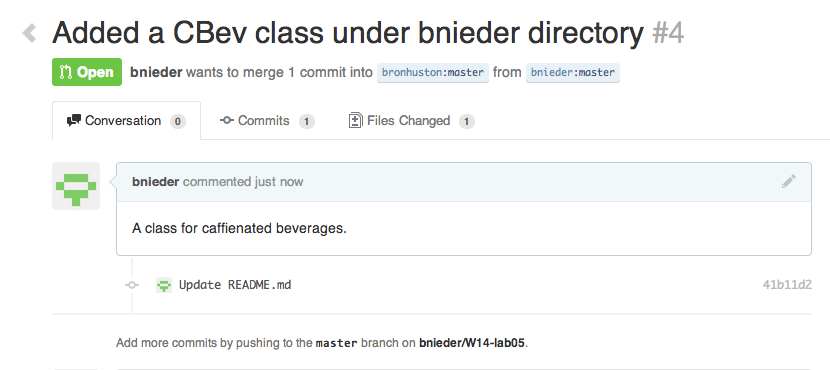
Once that’s done, your mentors will take steps to incorporate your changes into the repository. If you complete the lab during the lab period in which it was assigned, check with him/her immediately, as soon as you submit the pull request. Otherwise, check with him/her the following week in lab to be sure that your pull request was processed successfully.
Once you’ve done that, you are finished with this lab.
Grading Rubric:
Partial credit may be awarded for each step at the discretion of the TA/Instructor.
Mechanics
Your own version SimpleGui1
- SG (20 pts) Modified as indicated to change text and color of button
Your own Snowman code
- SN (40 pts) Modified as indicated so the snowman has a head
Two New Classes that Draw Objects
The two classes that draw objects are:
- (1) one that is similar to House.java or CoffeeCup.java, that extends GeneralPathWrapper and implements Shape.
- (2) one that extends the first one you wrote (and also implements Shape).
Points:
- C1 (20 pts) The two classes to draw objects should be in your own package
- C2 (20 pts) The two classes that draw objects should each extend GeneralPathWrapper and implement Shape.
- C3 (50 pts) One class should inherit from the other.
- C4 (40 pts) Each of them should have a constructor that initializes the encapsulated GeneralPath object so that it can be drawn.
- C5 (40 pts) The objects drawn should be recognizable as what they claim to be (i.e. a skateboard should look like a skateboard.)
- C6 (40 pts) The code for the objects should show good coding style.
- By this point in your programming career, you should know about things like using good variable names, indenting properly, factoring out common code into a subroutine, etc.
General Good Practices
- GP (30 pts) Following Instructions
- If there is anything that you should have done that was in the instructions but isn’t already covered elsewhere in the grading rubric, these points are the ones that are “at risk” for those items.
- Late submissions ALWAYS lose all of these points–and are subject to receiving a zero if the TA has already finished grading the assignment before the submission is received. TO ENSURE THAT YOU GET CREDIT, SUBMIT BEFORE THE DEADLINE.